Quick answer: Effective hand assembly scratch prevention starts by removing contact hazards before finished packaging reaches the packing line. Clean work surfaces, controlled handling, protective interleaving, suitable gloves or clean hands, separated components, and defined inspection points reduce avoidable surface damage. Quality teams should also establish project-specific defect criteria, inspect high-risk finishes under consistent lighting, record defects by production identification, and trace recurring scratches back to the workstation, handling step, material, or tool that caused them.
Why do scratches occur during hand packing and assembly?
Scratches usually occur when a finished surface contacts another component, debris, a rough workbench, an exposed tool, or an abrasive handling material. The risk becomes greater when workers repeatedly stack, slide, rotate, open, close, or load decorated packaging during manual operations.
Advent calendar boxes can involve wrapped rigid-board housings, drawers, doors, sleeves, printed panels, inserts, ribbons, magnets, and other components. Each additional manual contact creates another opportunity for scuffing or scratching.
Surface sensitivity also varies. A finish that tolerates normal handling on one project may show marks easily on another. Dark solid colors, high-gloss surfaces, metallic effects, certain laminated finishes, and large uninterrupted decorative panels can make handling marks particularly visible.
The actual risk should therefore be established from approved production-representative samples rather than assumed from the finish name alone.
What should a hand assembly scratch prevention process control?
A practical control process should manage the contact surface, operator handling, component movement, temporary stacking, tools, debris, and inspection conditions. Controlling only the final packing step is usually too late because damage may already have occurred during earlier assembly.
How should workstations be prepared?
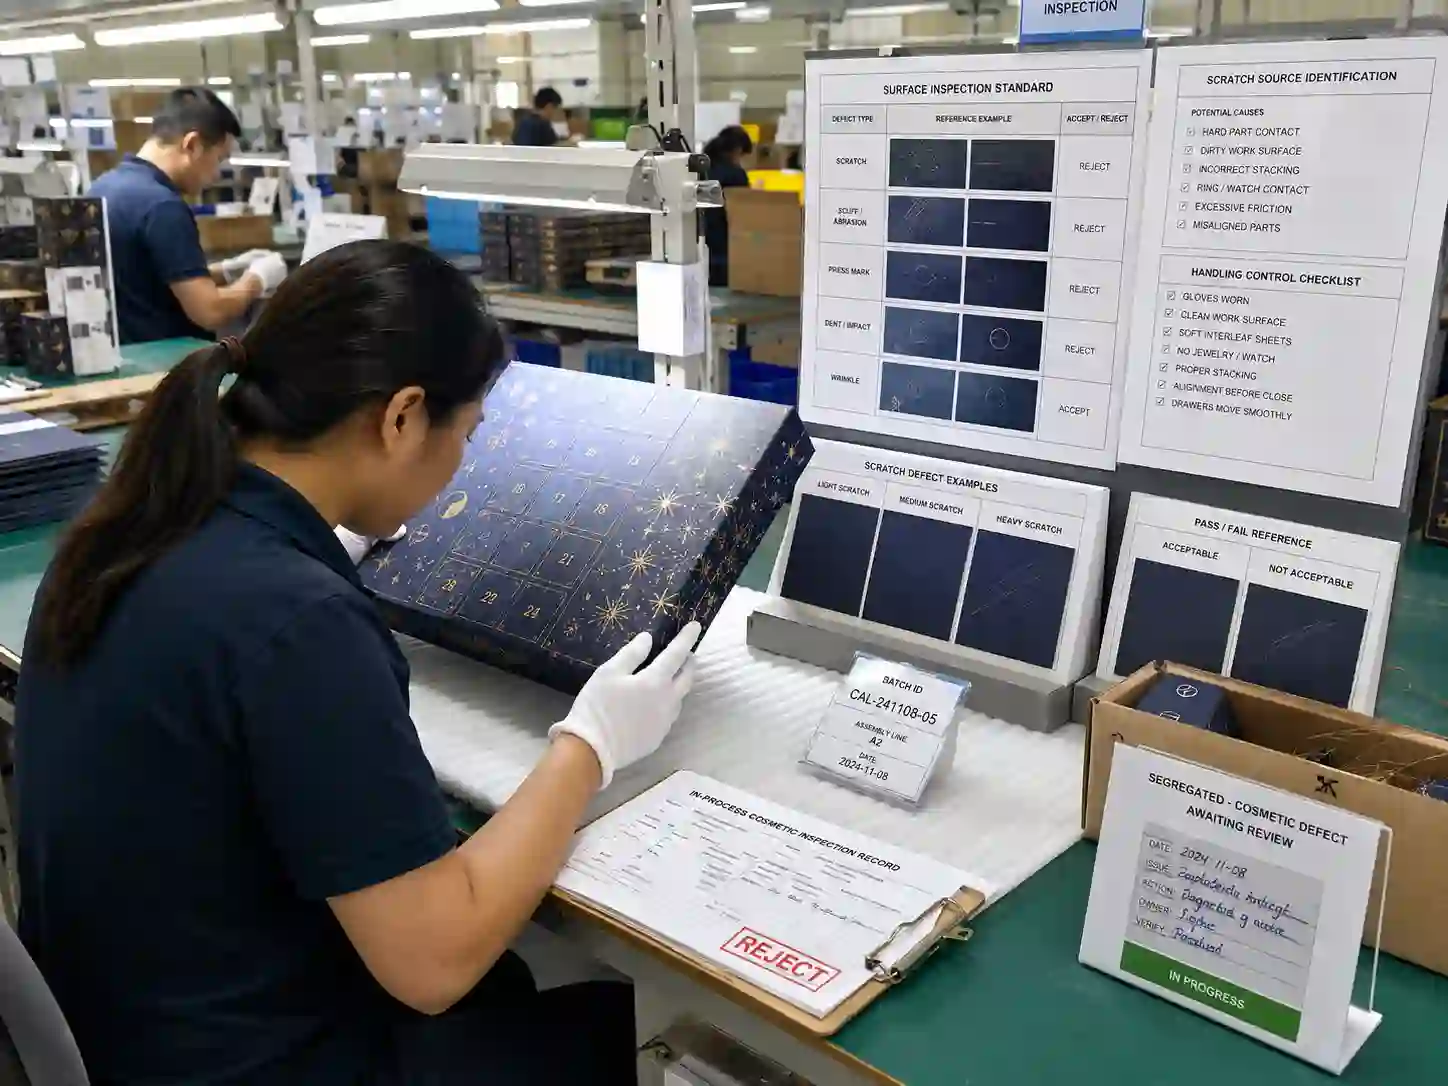
Work surfaces should be clean, smooth, and free from hard particles or exposed edges that can contact decorated packaging. Workstation condition should be checked before production and periodically during the shift.
Typical controls include:
- clean, non-abrasive contact surfaces suitable for the packaging finish;
- routine removal of paper fibers, board particles, dried adhesive, staples, metal fragments, and other debris;
- designated positions for knives, rulers, gauges, fixtures, and other tools;
- separation between incoming components, work in progress, accepted assemblies, and rejected pieces;
- limits on uncontrolled stacking or sliding of decorated surfaces; and
- replacement of dirty, damaged, or contaminated protective materials.
A workstation check can be verified through line inspection records, photographs, cleaning records, and direct observation during production.
How should operators handle finished surfaces?
Operators should be trained to lift and place components rather than drag decorated faces across benches or other components. Handling instructions should identify the safe grip areas for parts with sensitive visible surfaces.
Glove requirements are project-dependent. Clean gloves can be useful where fingerprints, oils, or direct hand contact create a problem, but unsuitable or contaminated gloves can themselves transfer debris or cause abrasion. The appropriate method should be confirmed against the actual surface and assembly operation.
For components requiring repeated turning or positioning, an assembly fixture or defined handling sequence can reduce unnecessary contact.
When should protective interleaving be used?
Interleaving should be considered when decorated surfaces could rub against each other during temporary stacking, movement between operations, or packing. The protective material itself must be clean and compatible with the finish.
Protection is not automatically required between every component. Packaging engineers and quality teams should identify where surface-to-surface contact actually occurs and approve the protection method during production preparation.
Where should scratch inspections take place?
Inspection should occur close enough to the risk-producing operation that a defect can be traced and corrected before many additional units are processed. A useful plan normally combines start-up verification, in-process checks, and inspection after high-risk handling steps.
| Inspection point | What to check | Evidence | Typical response |
|---|---|---|---|
| Workstation start-up | Cleanliness, contact surfaces, tools, protective materials | Line checklist or workstation record | Clean or correct station before release |
| First assembled units | New scratches, scuffs, rubbing marks, handling damage | First-piece or in-process record | Confirm process or investigate source |
| After high-risk assembly | Visible faces, edges, corners, doors, drawers, sleeves | QC inspection sheet | Segregate defects and correct handling |
| Before final packing | Overall cosmetic condition against approved criteria | Final visual inspection record | Accept, rework where approved, or segregate |
Inspection frequency should reflect the surface sensitivity, process stability, production stage, previous defect history, and buyer-approved quality plan. A universal sampling frequency should not be assumed for every project.
How should scratches be judged consistently?
Scratch acceptance needs defined viewing and defect criteria. Without a common inspection method, one inspector may reject a mark that another inspector considers acceptable.
The inspection specification can define the relevant visible surfaces, viewing conditions, comparison standard, and defect classification. Requirements should be practical enough to reproduce on the factory floor.
Useful reference evidence can include an approved sample, controlled defect photographs, marked inspection drawings, or physical examples representing acceptable and unacceptable appearance.
Which areas deserve the closest inspection?
Inspection priority should follow how the package is constructed and presented. Large customer-facing panels and other prominent surfaces may require closer cosmetic control than concealed internal areas, but the buyer-approved specification should determine the final classification.
A project-specific defect checklist may cover:
- scratches across principal visible panels;
- repeated parallel marks indicating sliding contact;
- scuffs around drawer, door, or sleeve openings;
- marks caused by assembly fixtures or tools;
- edge abrasion created during insertion or loading;
- surface damage transferred from debris trapped between stacked components;
- scratches that penetrate or visibly disrupt a decorative finish; and
- clusters of similar defects suggesting a recurring process problem.
Buyers should approve appearance requirements where cosmetic interpretation materially affects acceptance. The supplier’s QC team can then convert those approved requirements into repeatable inspection instructions.

How can engineers identify the source of recurring scratches?
Recurring scratches should be treated as process evidence rather than simply removed at final inspection. The position, direction, shape, and repetition of a mark can help identify where contact occurs.
For example, a similar linear scratch appearing in the same location on multiple units may point to a fixture edge, contaminated bench area, stacking method, or assembly movement. Random marks distributed across several surfaces may suggest uncontrolled handling or debris.
A useful investigation can follow the actual component through the process:
- identify the damaged surface and exact scratch position;
- check when that surface first becomes exposed;
- observe every subsequent handling and contact point;
- inspect benches, fixtures, tools, trays, gloves, and interleaving materials;
- compare defective units for a repeated damage pattern;
- change the suspected cause under controlled conditions; and
- inspect subsequent units to verify whether the defect stops recurring.
This approach provides stronger evidence than simply reminding operators to “handle carefully.”
How should scratch defects be traced during production?
Scratch defects should be connected to enough production information to identify where affected units came from and what corrective action was taken. The required traceability depth depends on the production system and approved quality plan.
For example, an inspector may find repeated scratches on a visible drawer front during an in-process check. The affected units are segregated and their production identification recorded. QC photographs the defect and notes the inspection stage and workstation. Investigation finds debris trapped on a component-contact surface. The station is cleaned, potentially affected work is inspected according to the defined containment decision, and newly assembled units are reinspected.
The record should connect the defect evidence, affected production identification, containment action, suspected or confirmed cause, corrective action, and reinspection result. This makes it possible to verify that the issue was addressed rather than merely recorded.
What corrective actions are appropriate when scratches are found?
The immediate response should contain affected material and stop the same cause from producing additional defects. The exact action depends on defect severity, affected quantity, process stage, and whether rework is technically and cosmetically acceptable.
Corrective actions may include cleaning or replacing workstation coverings, removing contaminated interleaving, repairing a fixture contact point, changing the stacking orientation, reducing stack height, separating decorated surfaces, changing a handling sequence, or retraining operators on a specific movement.
Rework should not be assumed to be acceptable. Attempts to polish, wipe, coat, touch up, or otherwise repair a decorative surface can change gloss, color, texture, or appearance. Any rework method affecting appearance should be validated and approved where required.
After corrective action, QC should inspect new output and document the verification result. If the defect continues, the suspected root cause has not been adequately controlled.
What evidence should buyers request for scratch control?
Buyers do not need excessive paperwork, but they should be able to verify that sensitive surfaces have defined controls and that defects can be traced when they occur.
Useful evidence can include the approved appearance reference, relevant inspection criteria, production QC records, defect photographs, production identification, segregation records, corrective-action documentation, and reinspection results.
For complex custom packaging, the production team should also know which surfaces have special cosmetic requirements before assembly begins. Structural and finish information established through custom advent calendar box services can therefore be translated into practical production instructions rather than left as general artwork expectations.

Which scratch-control requirements vary by project?
Surface sensitivity, inspection criteria, protection methods, and acceptable cosmetic limits are project-dependent. They should be confirmed from the actual materials, finishes, construction, handling sequence, and buyer requirements.
Verifiable production facts include whether workstations are clean, whether specified protection is being used, where a scratch occurs, which production identification is affected, and whether corrective action removed the recurring cause.
Recommendations such as glove type, interleaving material, inspection frequency, or fixture design require project-specific validation. Cosmetic acceptance limits and any appearance-sensitive rework should be aligned with buyer-approved standards.
Purchasing and quality teams reviewing custom advent calendar box products should therefore treat scratch control as part of the defined production inspection plan rather than relying on a generic instruction to protect finished boxes.
Frequently asked questions about hand assembly scratch prevention
Can protective film eliminate scratches during assembly?
No single protective method eliminates every scratch risk. Film may be appropriate for some surfaces but unsuitable or unnecessary for others, and the application or removal process can introduce additional handling. Compatibility should be verified on the actual finish.
Should every minor surface mark be rejected?
Not automatically. Acceptance should follow the approved cosmetic standard, defect classification, inspection conditions, and importance of the affected surface. Controlled reference samples or defect photographs help prevent subjective decisions.
Why do scratches sometimes appear only near the end of production?
Workstation contamination, worn protective materials, accumulated debris, damaged fixtures, or changes in operator handling can introduce a defect after production has already started. Periodic in-process checks help detect these changes before final inspection.
What is the best evidence that a corrective action worked?
The strongest evidence is documented reinspection of output produced after the corrective action, combined with confirmation that the previously recurring defect no longer appears under the defined inspection method.
If your project has scratch-sensitive printed, laminated, wrapped, or specialty-finished surfaces, request a custom quote and include the relevant appearance requirements so handling and inspection controls can be considered with the packaging specification.